開源解析 iOS App - DownTube
本文目錄 -
簡介
iOS相關函式庫
資料夾結構
程式進入點
RootViewControl:MasterViewController
XCDYouTubeKit
下載並儲存影片
播放影片
心得
參考資料
簡介
DownTube是一個可以下載Youtube影片的iOS App,但因為受限於Youtube的授權關係,本文以技術分享為主,嚴禁商業使用!
本文會以三個部分來解析”DownTube”,首先從Youtube的播放連結找出檔案的下載位址,接著開始一個新的下載工作下載的格式是mp4,有一定的儲存路徑與檔案命名原則,最後是播放影音檔案,一樣會從資料結構開始,接著根據App的執行流程解析這個專案.
專案原始碼連結 link
iOS相關函式庫
AVPlayer : AVFoundation
CoreData
NSURLSessionDownloadTask : NSURLSessionTask
資料夾結構

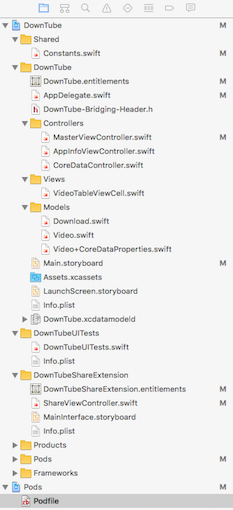
首先看到第一層的資料夾有個Podfile,表示這個專案有使用第三方的套件管理,使用的函式庫有:
- XCDYouTubeKit: 一個可以解析Youtube影片資訊的函式庫,此專案主要使用到各種解析度的檔案下載位址
- Fabric: 使用者行為統計的第三方函式褲
- Crashlytics: 蒐集App無預警崩框的訊息
- MMWormhole: App跟Extension之間溝通的函式庫
在開啟專案之前,要先在Termail下指令”pod install”把第三方函式庫加入專案中,之後再點擊”DownTube.xcworkspace”開啟專案.
開啟專案後我們看到DownTube專案內以下資料夾:
- Shared: 一個封裝NSUserDefaults的物件”Constants”
- DownTube: 本文主要分析的重點內容
- DownTubeUITests: UI測試程式碼,不解析
- DownTubeShareExtension: 這個Extension能在Safari中直接啟動DownTube下載影片
- Products: 系統自動產生,不解析
- Pods: 函式庫管理工具自動產生,不解析
- Frameworks: 系統自動產生,不解析
程式進入點
首先我們觀察AppDelegate.m,發現了三個跟系統特性是事件有關的設定:
1.設定聲音播放模式,為’AVAudioSessionCategoryPlayback’,忽略靜音鍵強制發出聲音.
do {
        try AVAudioSession.sharedInstance().setCategory(AVAudioSessionCategoryPlayback)
    } catch {
        print("Background audio not enabled")
    }
2.App結束前,將資料寫入Core Data
func applicationWillTerminate(application: UIApplication) {
    // Called when the application is about to terminate. Save data if appropriate. See also applicationDidEnterBackground:.
    // Saves changes in the application's managed object context before the application terminates.
    CoreDataController.sharedController.saveContext()
}
3.背景下載
func application(application: UIApplication, handleEventsForBackgroundURLSession identifier: String, completionHandler: () -> Void) {
    self.backgroundSessionCompletionHandler = completionHandler
}
note: 一篇關於背景下載的文章 link
另外此專案是使用Storyboard實作UI,所以看不到RootViewController的設定.
RootViewControl
從Storyboard中可以得知,此專案的根頁面是MasterViewController,主要有兩個導覽列的按鈕(Edit,About),跟一個TableView,TableView與上方一個DownLoad New Video的按鈕,我們就從這個下載按鈕說起.
按下Download New Video按鈕會觸發一個函式”askUserForURL”:
@IBAction func askUserForURL(sender: AnyObject)
askUserForURL()是要使用者輸入Youtube影像連結,以Hebe的小幸運為例,連結是”https://www.youtube.com/watch?v=CFTZSSJyy7A“
使用者輸入Youtube播放網址後會從網址列中取得這段影片的ID,以上述的範例網址影片的ID就是”CFTZSSJyy7A”,得到ID後就透過XCDYouTubeKit取得影片資訊,包括各種解析度的影片檔案位置(URL)
XCDYouTubeClient.defaultClient().getVideoWithIdentifier(String(url.characters.suffix(11))) {
video, error in
    self.videoObject(video, downloadedForVideoAt: url, error: error)
   UIApplication.sharedApplication().networkActivityIndicatorVisible = false
}
XCDYouTubeKit
Youtube官方提供了一個取得影片資訊的API(“get_video_info”),內容包括了title, thumbnail與各種解析度/檔案格式的連結…等等,以HEBE的小幸運為例:
http://www.youtube.com/get_video_info?video_id=CFTZSSJyy7A
由於回覆的資訊都是字串,而且不是標準的XML或者是JSON格式,所以利用XCDYouTubeKit將回傳的字串轉換為XCDYouTubeVideo物件:
public class XCDYouTubeVideo : NSObject, NSCopying {

    /**
     *  --------------------------------
     *  @name Accessing video properties
     *  --------------------------------
     */

    /**
     *  The 11 characters YouTube video identifier.
     */
    public var identifier: String { get }
    /**
     *  The title of the video.
     */
    public var title: String { get }
    /**
     *  The duration of the video in seconds.
     */
    public var duration: NSTimeInterval { get }

    /**
     *  A thumbnail URL for an image of small size, i.e. 120×90. May be nil.
     */
    public var smallThumbnailURL: NSURL? { get }
    /**
     *  A thumbnail URL for an image of medium size, i.e. 320×180, 480×360 or 640×480. May be nil.
     */
    public var mediumThumbnailURL: NSURL? { get }
    /**
     *  A thumbnail URL for an image of large size, i.e. 1'280×720 or 1'980×1'080. May be nil.
     */
    public var largeThumbnailURL: NSURL? { get }

    /**
     *  A dictionary of video stream URLs.
     *
     *  The keys are the YouTube [itag](https://en.wikipedia.org/wiki/YouTube#Quality_and_formats) values as `NSNumber` objects. The values are the video URLs as `NSURL` objects. There is also the special `XCDYouTubeVideoQualityHTTPLiveStreaming` key for live videos.
     *
     *  You should not store the URLs for later use since they have a limited lifetime and are bound to an IP address.
     *
     *  @see XCDYouTubeVideoQuality
     *  @see expirationDate
     */

    public var streamURLs: [NSObject : NSURL] { get }

    /**
     *  The expiration date of the video.
     *
     *  After this date, the stream URLs will not be playable. May be nil if it can not be determined, for example in live videos.
     */
    public var expirationDate: NSDate? { get }
}
一篇關於拆解YouTube URL的文章link
在XCDYouTubeKit中的Video物件只有低中高三種解析度的URL資訊,事實上不只這些解析度,讀者可以透過另外一個專案You-Get瞭解更多影片資訊.
kobeyu$ you-get -i https://www.youtube.com/watch?v=CFTZSSJyy7A
site:                YouTube
title:               田馥甄 Hebe Tien [ 小幸運 官方Live版 A Little Happiness] LIVE Version (如果 田馥甄巡迴演唱會)
streams:             # Available quality and codecs
[ DASH ] ____________________________________
- itag:          137
  container:     mp4
  quality:       1920x1080
  size:          87.2 MiB (91407373 bytes)
# download-with: you-get --itag=137 [URL]

- itag:          248
  container:     webm
  quality:       1920x1080
  size:          79.1 MiB (82939675 bytes)
# download-with: you-get --itag=248 [URL]

- itag:          136
  container:     mp4
  quality:       1280x720
  size:          46.1 MiB (48308712 bytes)
# download-with: you-get --itag=136 [URL]

- itag:          247
  container:     webm
  quality:       1280x720
  size:          39.8 MiB (41687812 bytes)
# download-with: you-get --itag=247 [URL]

- itag:          135
  container:     mp4
  quality:       854x480
  size:          25.1 MiB (26370772 bytes)
# download-with: you-get --itag=135 [URL]

- itag:          244
  container:     webm
  quality:       854x480
  size:          21.1 MiB (22146590 bytes)
# download-with: you-get --itag=244 [URL]

- itag:          134
  container:     mp4
  quality:       640x360
  size:          14.3 MiB (15000639 bytes)
# download-with: you-get --itag=134 [URL]

- itag:          243
  container:     webm
  quality:       640x360
  size:          13.9 MiB (14599703 bytes)
# download-with: you-get --itag=243 [URL]

- itag:          133
  container:     mp4
  quality:       426x240
  size:          11.9 MiB (12459119 bytes)
# download-with: you-get --itag=133 [URL]

- itag:          242
  container:     webm
  quality:       426x240
  size:          9.5 MiB (9911538 bytes)
# download-with: you-get --itag=242 [URL]

- itag:          160
  container:     mp4
  quality:       256x144
  size:          7.5 MiB (7910663 bytes)
# download-with: you-get --itag=160 [URL]

- itag:          278
  container:     webm
  quality:       256x144
  size:          7.3 MiB (7653435 bytes)
# download-with: you-get --itag=278 [URL]

[ DEFAULT ] _________________________________
- itag:          22
  container:     mp4
  quality:       hd720
  size:          46.1 MiB (48288653 bytes)
# download-with: you-get --itag=22 [URL]

- itag:          43
  container:     webm
  quality:       medium
# download-with: you-get --itag=43 [URL]

- itag:          18
  container:     mp4
  quality:       medium
# download-with: you-get --itag=18 [URL]

- itag:          36
  container:     3gp
  quality:       small
# download-with: you-get --itag=36 [URL]

- itag:          17
  container:     3gp
  quality:       small
# download-with: you-get --itag=17 [URL]
其中itag代表著不同的解析度與格式(iTag列表)
一篇關於拆解YouTube URL的文章 link
下載並儲存影片
當成功取得XCDYouTubeVideo物件後,接下來就要下載影片到本地端,這段的程式碼如下:
//MARK: - Helper methods

/**
 Called when the video info for a video is downloaded

 - parameter video:      optional video object that was downloaded, contains stream info, title, etc.
 - parameter youTubeUrl: youtube URL of the video
 - parameter error:      optional error
 */
func videoObject(video: XCDYouTubeVideo?, downloadedForVideoAt youTubeUrl: String, error: NSError?) {
    if let videoTitle = video?.title {
        print("\(videoTitle)")

        var streamUrl: String?

        if let highQualityStream = video?.streamURLs[XCDYouTubeVideoQuality.HD720.rawValue]?.absoluteString {

            //If 720p video exists
            streamUrl = highQualityStream

        } else if let mediumQualityStream = video?.streamURLs[XCDYouTubeVideoQuality.Medium360.rawValue]?.absoluteString {

            //If 360p video exists
            streamUrl = mediumQualityStream

        } else if let lowQualityStream = video?.streamURLs[XCDYouTubeVideoQuality.Small240.rawValue]?.absoluteString {

            //If 240p video exists
            streamUrl = lowQualityStream
        }

        if let video = video, streamUrl = streamUrl {
            self.createObjectInCoreDataAndStartDownloadFor(video, withStreamUrl: streamUrl, andYouTubeUrl: youTubeUrl)

            return
        }
    }
    //Show error to user and remove all errored out videos
    self.showErrorAndRemoveErroredVideos(error)
}
從程式碼中可以看出來,作者是由高中低解析的判斷是否有相對應的連結存在,如果不存在高中低解析度則顯示錯誤並返回程序,若存在任一解析度連結,則新增一個CoreData物件並開始下載,這段程式碼如下:
/**
     Creates new video object in core data, saves the information for that video, and starts the download of the video stream
 - parameter video:      video object
 - parameter streamUrl:  streaming URL for the video
 - parameter youTubeUrl: youtube URL for the video (youtube.com/watch?=v...)
 */
func createObjectInCoreDataAndStartDownloadFor(video: XCDYouTubeVideo?, withStreamUrl streamUrl: String, andYouTubeUrl youTubeUrl: String) {

    //Make sure the stream URL doesn't exist already
    guard self.videoIndexForYouTubeUrl(youTubeUrl) == nil else {
        self.showErrorAlertControllerWithMessage("Video already downloaded")
        return
    }

    let context = CoreDataController.sharedController.fetchedResultsController.managedObjectContext
    let entity = CoreDataController.sharedController.fetchedResultsController.fetchRequest.entity!
    let newVideo = NSEntityDescription.insertNewObjectForEntityForName(entity.name!, inManagedObjectContext: context) as! Video

    newVideo.created = NSDate()
    newVideo.youtubeUrl = youTubeUrl
    newVideo.title = video?.title
    newVideo.streamUrl = streamUrl
    newVideo.userProgress = 0

    do {
        try context.save()
    } catch {
        abort()
    }

    //Starts the download of the video
    self.startDownload(newVideo)
}
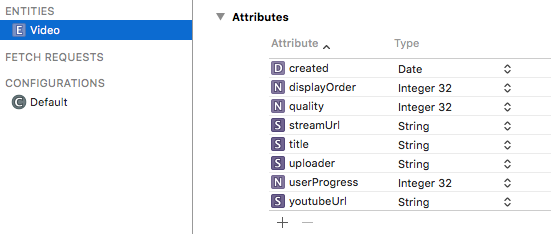
這邊使用了”guard”來判斷URL是否為空,如果為空則顯示錯誤訊息並退出程序,再繼續往下探究程式碼之前,我們先來看看開法者在Core Data的資料結構設定:

由上圖我們可以知道要存進Core Data的物件有8個特性.
在產生完Core Data來存放影片資訊後,接著就要進入函式”self.startDownload”開始一個新的下載工作:
//MARK: - Downloading methods

/**
 Starts download for video, called when track is added

 - parameter video: Video object
 */
func startDownload(video: Video) {
    print("Starting download of video \(video.title) by \(video.uploader)")
    if let urlString = video.streamUrl, url = NSURL(string: urlString), index = self.videoIndexForStreamUrl(urlString) {
        let download = Download(url: urlString)
        download.downloadTask = self.downloadsSession.downloadTaskWithURL(url)
        download.downloadTask?.resume()
        download.isDownloading = true
        self.activeDownloads[download.url] = download

        self.tableView.reloadRowsAtIndexPaths([NSIndexPath(forRow: index, inSection: 0)], withRowAnimation: .None)
    }
}
這段重點在於如何產生一個新的NSURLSessionDownloadTask,並啟動下載程序,並且在過程中要持續更新UI讓使用者清楚的知道現在的進度是多少,在下載完成後將暫存的檔案移至指定的位置並同時更改檔名.
一個新的NSURLSessionDownloadTask是透過以下這行程式初始化的:
download.downloadTask = self.downloadsSession.downloadTaskWithURL(url)
在往前追朔self.downloadsSession的資料結構與初始化的方式:
lazy var downloadsSession: NSURLSession = {
    let configuration = NSURLSessionConfiguration.backgroundSessionConfigurationWithIdentifier("bgSessionConfiguration")
    let session = NSURLSession(configuration: configuration, delegate: self, delegateQueue: nil)
    return session
}()
從上述的設定中可以看到downloadsSession是可以在背景執行下載,並且透過delegate(NSURLSessionDelegate)接收回呼函式,這裡實現的回乎函式有:
1.func URLSession(session: NSURLSession, downloadTask: NSURLSessionDownloadTask, didFinishDownloadingToURL location: NSURL)
2.func URLSession(session: NSURLSession, downloadTask: NSURLSessionDownloadTask, didWriteData bytesWritten: Int64, totalBytesWritten: Int64, totalBytesExpectedToWrite: Int64)
其中的第一個函式在下載結束後會被呼叫,因為下載完的檔案會被暫存在系統中,所以要將這個暫存檔移到指定路徑做永久保存,這段程式如下:
//Download finished
func URLSession(session: NSURLSession, downloadTask: NSURLSessionDownloadTask, didFinishDownloadingToURL location: NSURL) {
    if let originalURL = downloadTask.originalRequest?.URL?.absoluteString {
        if let destinationURL = self.localFilePathForUrl(originalURL) {

            print("Destination URL: \(destinationURL)")
            let fileManager = NSFileManager.defaultManager()
            //Removing the file at the path, just in case one exists
            do {
                try fileManager.removeItemAtURL(destinationURL)
            } catch {
                print("No file to remove. Proceeding...")
            }

            //Moving the downloaded file to the new location
            do {
                try fileManager.copyItemAtURL(location, toURL: destinationURL)
            } catch let error as NSError {
                print("Could not copy file: \(error.localizedDescription)")
            }

            //Updating the cell
            if let url = downloadTask.originalRequest?.URL?.absoluteString {
                self.activeDownloads[url] = nil

                if let videoIndex = self.videoIndexForDownloadTask(downloadTask) {
                    dispatch_async(dispatch_get_main_queue(), {
                        self.tableView.reloadRowsAtIndexPaths([NSIndexPath(forRow: videoIndex, inSection: 0)], withRowAnimation: .None)
                    })
                }
            }
        }
    }
}
新的路徑與檔名是透過函式”self.localFilePathForUrl()”來處理,處理的方法是透過連結中取出VideoID作為檔名,而副檔名統一為.mp4格式,因為只下載mp4格式的檔案.
第二個Delegate函式則是在下載時持續更新UI讓使用者了解目前的下載進度,這段的程式碼如下:
//Updating download status
func URLSession(session: NSURLSession, downloadTask: NSURLSessionDownloadTask, didWriteData bytesWritten: Int64, totalBytesWritten: Int64, totalBytesExpectedToWrite: Int64) {

    if let downloadUrl = downloadTask.originalRequest?.URL?.absoluteString, download = self.activeDownloads[downloadUrl] {
        download.progress = Float(totalBytesWritten)/Float(totalBytesExpectedToWrite)
        let totalSize = NSByteCountFormatter.stringFromByteCount(totalBytesExpectedToWrite, countStyle: NSByteCountFormatterCountStyle.Binary)
        if let trackIndex = self.videoIndexForDownloadTask(downloadTask), let VideoTableViewCell = tableView.cellForRowAtIndexPath(NSIndexPath(forRow: trackIndex, inSection: 0)) as? VideoTableViewCell {
            dispatch_async(dispatch_get_main_queue(), {

                let done = (download.progress == 1)

                VideoTableViewCell.progressView.hidden = done
                VideoTableViewCell.progressLabel.hidden = done
                VideoTableViewCell.progressView.progress = download.progress
                VideoTableViewCell.progressLabel.text =  String(format: "%.1f%% of %@",  download.progress * 100, totalSize)
            })
        }
    }
}
一篇關於NSURLSessionDownloadTask的文章 link
播放影片
當檔案下載完畢後點擊曲目就會開始播放,由於曲目是透過TableView呈現,所以點擊後會觸發TableView的”didSelectRowAtIndexPath”,這部分的程式碼如下:
override func tableView(tableView: UITableView, didSelectRowAtIndexPath indexPath: NSIndexPath) {
    let video = CoreDataController.sharedController.fetchedResultsController.objectAtIndexPath(indexPath) as! Video
    if self.localFileExistsFor(video) {
        self.playDownload(video, atIndexPath: indexPath)
    }
    tableView.deselectRowAtIndexPath(indexPath, animated: true)
}
首先判斷要播放的檔案是否存在,由於檔案的資訊是存在Core Data而影音檔案是存在App的資料夾,所以成功從Core Data取出檔案資訊,不代表檔案一定存在!
若要播放已下載的檔案則進入函式”self.playDownload(video, atIndexPath: indexPath)”這部分的程式碼如下:
/**
 Plays video in fullscreen player

 - parameter video:     video that is going to be played
 - parameter indexPath: index path of the video
 */
func playDownload(video: Video, atIndexPath indexPath: NSIndexPath) {


    if let urlString = video.streamUrl, url = self.localFilePathForUrl(urlString) {

          //路徑是指到一個.mp4的本地端檔案
          //以我自己執行的時候路徑是:
          //file:///var/mobile/Containers/Data/Application/FA30A6EC-AE24-4783-8DC6-4DE254133585/Documents/o-AOzX-MYrc2CU8zM.mp4
        let player = AVPlayer(URL: url)

        //Seek to time if the time is saved
        if let time = video.userProgress as? Double {
            player.seekToTime(CMTime(seconds: time, preferredTimescale: 1))
        }

        let playerViewController = AVPlayerViewController()
        video.userProgress = 0
        player.addPeriodicTimeObserverForInterval(CMTime(seconds: 10, preferredTimescale: 1), queue: dispatch_get_main_queue()) { [weak self] time in

            //Every 5 seconds, update the progress of the video in core data
            let intTime = Int(CMTimeGetSeconds(time))
            let totalVideoTime = CMTimeGetSeconds(player.currentItem!.duration)
            let progressPercent = Double(intTime) / totalVideoTime

            print("User progress on video in seconds: \(intTime)")

            //If user is 95% done with the video, mark it as done
            if progressPercent > 0.95 {
                video.userProgress = nil
            } else {
                video.userProgress = intTime
            }

            CoreDataController.sharedController.saveContext()
            self?.tableView.reloadRowsAtIndexPaths([indexPath], withRowAnimation: .None)

        }
        playerViewController.player = player
        self.presentViewController(playerViewController, animated: true) {
            playerViewController.player!.play()
        }
    }
}
本專案播放是透過AVFoundation中的AVPlayer與AVPlayerViewController分別作為影音播放的控制與顯示,重點在以下這幾行程式:
1.宣告一個AVPlayer物件,並指定要播放的本地端檔案路徑給這個AVPlayer
let player = AVPlayer(URL: url)
2.宣告一個timer定時依播放進度更新UI與儲存播放資訊
player.addPeriodicTimeObserverForInterval(CMTime(seconds: 10, preferredTimescale: 1), queue: dispatch_get_main_queue()) { [weak self] time in
3.宣告一個playerViewController並將以初始化的player(AVPlayer)指定給playerViewController
playerViewController.player = player
4.顯示畫面並開始播放
self.presentViewController(playerViewController, animated: true) {
            playerViewController.player!.play()
}
note: 一篇關於AVPlayer的文章 link
心得
這個專案的重點在於下載,儲存與播放,除了XCDYouTubeKit之外,核心的部分都是使用iOS提供的框架所完成的,所以有一定經驗的開發者應該能夠輕鬆地掌握這個專案.
在分析專案的過程中發現兩個可以改進的問題或項目:
1.當檔案正在下載中或者是暫停下載的情況下關掉App,重新開啟之後會發現剛剛正在下載的檔案已經不再下載,點及該檔案也無法播放.
2.有其他使用者在這個專案的Github中開了一個Issue希望能夠把已下載的檔案移到系統相簿中(Camera Roll)
參考資料
DownTube專案原始碼 link
一篇關於NSURLSession的文章 link
一篇關於拆解YouTube URL的文章 link
iTag列表 link
XCDYouTubeKit是支援iOS,tvOS與OS X的開源專案 link
一篇關於AVPlayer的文章 link