開源解析 iOS App - HTY360Player (一)
本文目錄 -
簡介
資料夾結構
Root ViewControl : HTYMenuVC
HTY360PlayerVC
心得
Reference
簡介
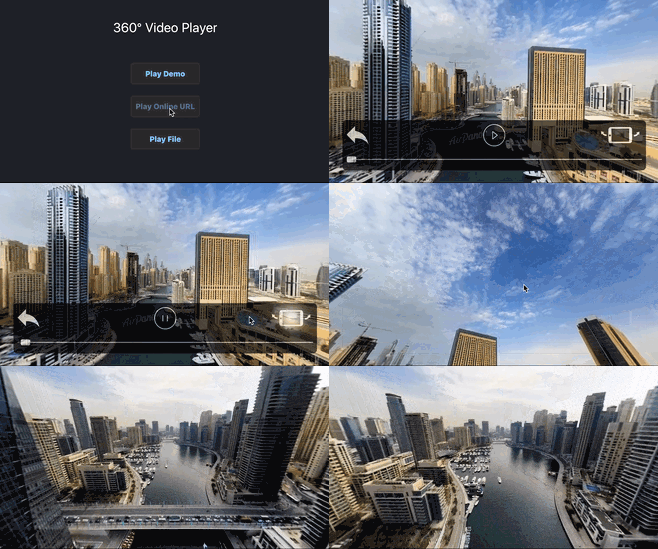
HTY360Player是一個播放360度影片的iOS App,播放影片時可以藉由移動手機而轉換視角,允許的來源有三個:
1.App內建的展示影片
2.線上連結
3.手機相簿內的影片

這次解析的重點有兩個部分,一個是播放器的解碼(AVFoundation)與UI操作,第二部分是使用OpenGL渲染影像,我們將從資料結構與執行流程來解析這個專案.
專案原始碼連結: Github Link
資料夾結構

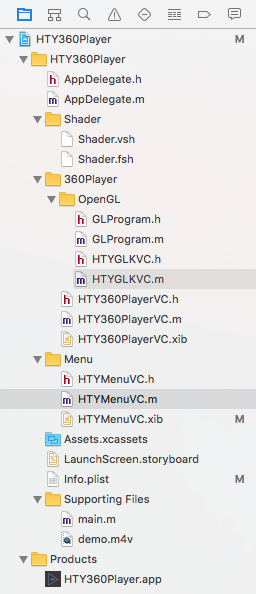
- 主資料夾(HTY360Player) - 除了基本的檔案(main/AppDelegate)之外還有一個展示影片檔案demo.m4v
- Shader - OpenGL在渲染影像時所需要的檔案
- 360Player -
- OpenGL - OpenGL實作的程式碼
- HTY360PlayerVC - 播放影像的頁面,影像解碼的實作也在這邊完成
- Menu
- App的根頁面(RootViewControl),主要功能在於選擇影像來源.
ROOT ViewControl
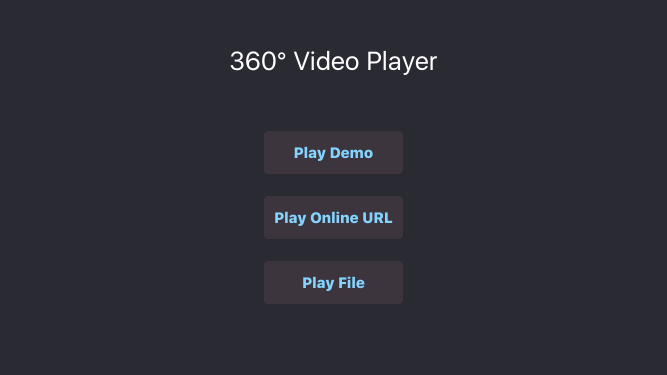
接著就順著App的執行流程來解析這次的專案,觀察AppDelegate.m中可以得知,RootVC是HTYMenuVC,所以開啟App後可以看到在HTYMenuVC的畫面是三個按鈕,分別是選擇不同的檔案來源:1.內建demo影片 2.開啟線上連結 3.選擇手機上現有的檔案:

在HTYMenuVC.m中可以發現,無論是選擇哪一個點案來源到最後都會呼叫 “[[HTY360PlayerVC alloc] initWithNibName:@”HTY360PlayerVC” bundle:nil url:url]” 其中的url就是檔案的路徑來源,包含本地端與遠端的路徑都支持,在遠端檔案的部分,預設是指向”http://d8d913s460fub.cloudfront.net/krpanocloud/video/airpano/video-1920x960a.mp4“.
HTY360PlayerVC
在HTYMenuVC選擇完影像的檔案來源後會開啟第二個頁面”HTY360PlayerVC”,一樣順著ViewController的生命週期開始觀察,在這個VeiwController初始化可分為兩個階段:
- initWithNibName:bundle:url:
url:這是一個客製化的初始化方法,除了產生HTY360PlayerVC的instance之外,只做一件事情就是設定成員變數”videoURL” ViewDidLoad
這邊是初始化的第二個部分也是最後一個步驟,設定了很多東西,包括App的事件通知(app進入背景與再次回到app),影像解碼器的設定,opengl初始化以及ui元件的設置.a.註冊系統事件通知 b.設定影音解碼器:[self setupVideoPlaybackForURL:_videoURL] c.設定OpenGL:[self configureGLKView]; d.設定UI元件:[self configurePlayButton]; e.設定UI元件:[self configureProgressSlider]; f.設定UI元件:[self configureControleBackgroundView]; g.設定UI元件:[self configureBackButton]; h.設定UI元件:[self configureGyroButton];
我們會把重點擺在前三個a,b,c, configurePlayButton之後的不看,是因為這些都是設置UI元件,我們還是把重點放在與影音播放的部分為主.
a.註冊系統事件通知
在HTY360PlayerVC的ViewDidLoad函式中我們可以看到一開始作者註冊了兩個事件通知
1.UIApplicationWillResignActiveNotification
2.UIApplicationDidBecomeActiveNotification
這兩個事件分別是App即將停止運作,可能是使用者按了HOME鍵,切換到其他App或進入待機模式…etc,此時App就會暫停播放.第二個事件是當使用者再次回到App,此時播放的進度條(Slider)會回到上次離開App的那個時間,並保持暫停等待使用者按下播放鍵開始播放.
通常影音串流的App在使用者暫時離開時暫停是必要的,這有很多原因有技術考量也有商業考量,就技術層面來看,進入背景後OS會暫停你的應用程式,除非你向OS請求要背景播放,不然被OS停止之後再回來App通常會造成非預期的崩潰,暫停播放也可以節省電池用電,如果是線上串流可以節省頻寬進一步節省成本…etc
note: 一篇關於iOS App生命週期的文章 link
b.設定影音解碼器:[self setupVideoPlaybackForURL:_videoURL]
在這個階段作者設定了以下幾個變數分別是:
1.self.videoOutput(AVPlayerItemVideoOutput) : 儲存影像解碼後的資料,採用YCbCr格式.
2.self.player(AVPlayer) : 控制播放器的暫停,控制...等等.
3.AVAudioSession : 設定聲音輸出.
4.AVURLAsset *asset : 主要處理播放來源路徑與偵測是否為有效檔案.
self.videoOutput(AVPlayerItemVideoOutput)
self.videoOutput(AVPlayerItemVideoOutput)存放了解碼後的影像,資料格式是YCbCr420,這個格式通常是H264解碼器的原生輸出,也是OpenGL支援的影像資料來源,通常在iOS在實作串流應用時渲染的部分通常有兩種選擇OpenGL+YCbCr或者是UIImage+RGB,前者有比較好的效能表現,因為解碼與渲染分別是透過CPU與GPU,後者都是CPU負責,但要使用OpenGL渲染初期學習的門檻稍高.
self.player(AVPlayer)
AVPlayer是播放器的核心物件,提供了play,pause,seek…等等的控制項,以及目前播放位置,播放速度(rate),音量…等等資訊,接下來將會介紹self.player與其他函式的關係並推敲作者意圖.
note: 一篇關於AVPlayer的文章 link
播放:
    以下是播放按鈕的對應函式
    - (IBAction)playButtonTouched:(id)sender {
        [NSObject cancelPreviousPerformRequestsWithTarget:self];
        if ([self isPlaying]) {
            [self pause];
        } else {
            [self play];
        }
    }

       當按下之後會先呼叫"cancelPreviousPerformRequestsWithTarget",
    取消先前註冊的@selector,而整個檔案裡面只有一個地方用到,就是延遲三秒隱藏選單的功能
    "[self performSelector:@selector(hideControlsSlowly) withObject:nil afterDelay:HIDE_CONTROL_DELAY];"
        接著是判斷player是不是在播放的狀態,進一步去看[self isPlaying]的實作,
    發現只有一行程式:return self.mRestoreAfterScrubbingRate != 0.f || [self.player rate] != 0.f;
        這邊要先解釋一下,作者在滑動時間軸的時候會先暫停影像播放,實作的方法是把目前播放器的速度
    (self.player.rate)存儲到self.mRestoreAfterScrubbingRate,
    然後再把self.player.rate設定為零,所以在判斷是不是播放時才會判斷這兩個成員變數,
        若目前不是在播放狀態則會進入[self play],進一步觀察實作方式,
    一開始會再次判斷現在是否在播放中,接著避免在播放前時間軸被拉到影片結尾的地方直接暫停,
    所以當這個情況發生時就從頭開始播放,最後才呼叫[self.player play],並更新UI狀態.

    - (void)play {
        if ([self isPlaying])
            return;
        /* If we are at the end of the movie, we must seek to the beginning first
         before starting playback. */
        if (YES == self.seekToZeroBeforePlay) {
            self.seekToZeroBeforePlay = NO;
            [self.player seekToTime:kCMTimeZero];
        }

        [self updatePlayButton];
        [self.player play];
        [self scheduleHideControls];
    }
一篇關於cancelPreviousPerformRequestsWithTarget的文章 link
-
暫停:
        - (void)pause {
        if (![self isPlaying])
            return;

        [self updatePlayButton];
        [self.player pause];

        [self scheduleHideControls];
    }
    暫停的實作相對就簡單很多,先是判斷是否在播放中,若是則呼叫[self.player pause]與更新
    UI元件.
-
SEEK:
        SEEK是配合UISlider的觸發動作,從開始滑動到結束可以分為三個階段:
    開始滑動,滑動中,跟結束滑動,其中滑動中的觸發可以分為持續或非持續,這邊作者採用的是不持續,
    也就是手離開Slider後才會觸發,所以觸發的時間點跟結束滑動非常接近,
    而本文也將分析這三個實作的內容:

開始滑動:
    - (IBAction)beginScrubbing:(id)sender {
        printf("beginScrubbing\n");
        self.mRestoreAfterScrubbingRate = [self.player rate];
        [self.player setRate:0.f];

        /* Remove previous timer. */
        [self removeTimeObserverForPlayer];
    }

        當開始滑動的事件被觸發後,作者先將目前播放器的速度暫存起來,然後再將速度停整為零,
    達到pause的效果,並將一個每秒觸發約60次的timer暫停,這個timer主要目的是更新slider
    的位置.


滑動中:
    - (IBAction)scrub:(id)sender {
        printf("scrub\n");
        if ([sender isKindOfClass:[UISlider class]]) {
            UISlider* slider = sender;

            CMTime playerDuration = [self playerItemDuration];
            if (CMTIME_IS_INVALID(playerDuration)) {
                return;
            }

            double duration = CMTimeGetSeconds(playerDuration);
            if (isfinite(duration)) {
                float minValue = [slider minimumValue];
                float maxValue = [slider maximumValue];
                float value = [slider value];

                double time = duration * (value - minValue) / (maxValue - minValue);

                [self.player seekToTime:CMTimeMakeWithSeconds(time, NSEC_PER_SEC)];
            }
        }
    }

        當使用者滑到了要播放的時間點,透過簡單計算相段時間,然後設定self.player seek到指定
    的時間,要注意的是在這個階段self.player的播放速度仍然是零,還是停留在PAUSE的狀態.


結束滑動:
    - (IBAction)endScrubbing:(id)sender {
        printf("endScrubbing\n");
        if (!self.timeObserver) {
            CMTime playerDuration = [self playerItemDuration];
            if (CMTIME_IS_INVALID(playerDuration)) {
                return;
            }

            double duration = CMTimeGetSeconds(playerDuration);
            if (isfinite(duration)) {
                CGFloat width = CGRectGetWidth([self.progressSlider bounds]);
                double tolerance = 0.5f * duration / width;

                __weak HTY360PlayerVC* weakSelf = self;
                self.timeObserver = [self.player addPeriodicTimeObserverForInterval:CMTimeMakeWithSeconds(tolerance, NSEC_PER_SEC)
                                                                              queue:NULL
                                                                         usingBlock:^(CMTime time) {
                                                                             [weakSelf syncScrubber];
                                                                         }];
            }
        }

        if (self.mRestoreAfterScrubbingRate) {
            [self.player setRate:self.mRestoreAfterScrubbingRate];
            self.mRestoreAfterScrubbingRate = 0.f;
        }
    }

    最後滑動的事件即將結束時,重新啟動更新UI的timer,並把播放速度還原到seek之前的數值.
AVAudioSession : 設定聲音輸出
設定聲音輸出模式為強制輸出,不受靜音鍵影響以及在背景時可持續發出聲音,但因為進入背景後就暫停播放了,所以作者會做這個設定推估是強制發出聲音為主要考量.
note: AVAudioSessionCategoryPlayback link
AVURLAsset *asset
AVURLAssert主要功能有兩個:一個是提供播放來源,第二個則是提供播放來源的資訊,這個資訊包含了是否可播放,有哪些可播放資訊(影像,聲音,字幕…etc),以下將一一介紹在程式中如何實現:
在這個應用中,播放來源是在初始化時提供url參數:
AVURLAsset *asset = [AVURLAsset URLAssetWithURL:url options:nil];
而載入資訊則是先宣告一個陣列,陣列裡面放入要偵測的鍵值,在這支程式中是”playable”與”tracks”,
然後再透過AVURLAsset提供的方法”loadValuesAsynchronouslyForKeys”從播放來源中載入指定的資訊(“playable”與”tracks”),最後透過AVURLAssert提供的方法”statusOfValueForKey”,來判斷載入是否成功,這部分的程式碼如下所列:
AVURLAsset *asset = [AVURLAsset URLAssetWithURL:url options:nil];

NSArray *requestedKeys = [NSArray arrayWithObjects:kTracksKey, kPlayableKey, nil];

[asset loadValuesAsynchronouslyForKeys:requestedKeys completionHandler:^{

dispatch_async( dispatch_get_main_queue(),^{

   /* Make sure that the value of each key has loaded successfully. */
   for (NSString *thisKey in requestedKeys) {
       NSError *error = nil;
       AVKeyValueStatus keyStatus = [asset statusOfValueForKey:thisKey error:&error];
       NSLog(@"key:%@ and result:%ld",thisKey,(long)keyStatus);
       if (keyStatus == AVKeyValueStatusFailed) {
           [self assetFailedToPrepareForPlayback:error];
           return;
       }
   }
                       ....
在上面的程式中一個FOR迴圈(for (NSString *thisKey in requestedKeys)),會先判斷所有載入的結果是否出錯(keyStatus == AVKeyValueStatusFailed),如果出錯了代表是一個不合法的播放來源或是不支援指定的鍵值,此時會顯示錯誤訊息並卸載相關變數([self assetFailedToPrepareForPlayback:error]).
確定了所有的參數都正確載入後,接著就是要將播放來源提供給self.player,並設定回呼函數(callback),這段程式碼如下所列:
NSError* error = nil;
AVKeyValueStatus status = [asset statusOfValueForKey:kTracksKey error:&error];
if (status == AVKeyValueStatusLoaded) {
    self.playerItem = [AVPlayerItem playerItemWithAsset:asset];
    [self.playerItem addOutput:self.videoOutput];
    [self.player replaceCurrentItemWithPlayerItem:self.playerItem];
    [self.videoOutput requestNotificationOfMediaDataChangeWithAdvanceInterval:ONE_FRAME_DURATION];

   /* When the player item has played to its end time we'll toggle
    the movie controller Pause button to be the Play button */
   [[NSNotificationCenter defaultCenter] addObserver:self
   selector:@selector(playerItemDidReachEnd:)
   name:AVPlayerItemDidPlayToEndTimeNotification object:self.playerItem];
   self.seekToZeroBeforePlay = NO;

   [self.playerItem addObserver:self
                     forKeyPath:kStatusKey
                        options:NSKeyValueObservingOptionInitial | NSKeyValueObservingOptionNew
                        context:AVPlayerDemoPlaybackViewControllerStatusObservationContext];

   [self.player addObserver:self
                 forKeyPath:kCurrentItemKey
                    options:NSKeyValueObservingOptionInitial | NSKeyValueObservingOptionNew
                    context:AVPlayerDemoPlaybackViewControllerCurrentItemObservationContext];

   [self.player addObserver:self
                 forKeyPath:kRateKey
                    options:NSKeyValueObservingOptionInitial | NSKeyValueObservingOptionNew
                    context:AVPlayerDemoPlaybackViewControllerRateObservationContext];


   [self initScrubberTimer];
   [self syncScrubber];
} else {
   NSLog(@"%@ Failed to load the tracks.", self);
}
在這部分的一開始,判斷鍵值”kTracksKey”是否已經載入”if (status == AVKeyValueStatusLoaded)”,若是成功載入則設定播放的物件self.playerItem,並指定給self.player,然後是一系列的回呼函數:
self.playerItem 物件:
1.當檔案播放完畢後呼叫函數:- (void)playerItemDidReachEnd:(NSNotification *)notification
設定self.seekToZeroBeforePlay = YES;,這樣當播放結束後再次按播放鍵會因為這個變數為YES而從頭開始播放. ref play()函式 @HTY360PlayerVC.m
2.當成員變數”status”發生數值改變時
相對應的處理函式如下所列:
if (context == AVPlayerDemoPlaybackViewControllerStatusObservationContext) {
    [self updatePlayButton];

    AVPlayerStatus status = [[change objectForKey:NSKeyValueChangeNewKey] integerValue];
    switch (status) {
            /* Indicates that the status of the player is not yet known because
             it has not tried to load new media resources for playback */
        case AVPlayerStatusUnknown: {
            [self removePlayerTimeObserver];
            [self syncScrubber];
            [self disableScrubber];
            [self disablePlayerButtons];
            break;
        }
        case AVPlayerStatusReadyToPlay: {
            /* Once the AVPlayerItem becomes ready to play, i.e.
             [playerItem status] == AVPlayerItemStatusReadyToPlay,
             its duration can be fetched from the item. */
            [self initScrubberTimer];
            [self enableScrubber];
            [self enablePlayerButtons];
            break;
        }
        case AVPlayerStatusFailed: {
            AVPlayerItem *playerItem = (AVPlayerItem *)object;
            [self assetFailedToPrepareForPlayback:playerItem.error];
            NSLog(@"Error fail : %@", playerItem.error);
            break;
        }
    }
}
這邊根據不同的狀態分別設定slider與play播放鍵.
-
self.player 物件:
1.成員變數”currentItem”發生數值改變時
} else if (context == AVPlayerDemoPlaybackViewControllerCurrentItemObservationContext) {
    /* AVPlayer "currentItem" property observer.
     Called when the AVPlayer replaceCurrentItemWithPlayerItem:
     replacement will/did occur. */

    //NSLog(@"AVPlayerDemoPlaybackViewControllerCurrentItemObservationContext");
}
這邊目前沒有做任何的事情,推測應該是預留或除錯用
2.成員變數”rate”發生數值改變時
} else if (context == AVPlayerDemoPlaybackViewControllerRateObservationContext) {
    [self updatePlayButton];
    // NSLog(@"AVPlayerDemoPlaybackViewControllerRateObservationContext");
}
在這個應用程式self.player.rate,只會有兩個值:0.0或1.0,分別代表著暫停跟播放,所以隨著數值的改變,UI按鈕也跟著改變,而改變的時機跟觸法點就從這邊開始.
-
這邊比較需要注意的是,官方文件說要預載入的鍵值(“loadValuesAsynchronouslyForKeys”中的keys)解釋如下:
An array of strings containing the required keys.
The keys are the property names of a class that adopts the protocol.
所以這些宣告成NSString的鍵值都是AVURLAsset的成員變數.
note: 一篇關於AVAsset的文章 link
note: APPLE官方文件,關於”loadValuesAsynchronouslyForKeys”的說明 link
心得
統一風格的命名方式:在HTY360PlayerVC初始化的過程中,可以看到在設定UI元件的時候有統一的命名方式,例如:
[self setupVideoPlaybackForURL:_videoURL];
[self configureGLKView];
[self configurePlayButton];
[self configureProgressSlider];
[self configureControleBackgroundView];
[self configureBackButton];
[self configureGyroButton];
這樣在第一次看到程式碼時可以很快地就先跳過configurePlayButton以下的函示呼叫,因為從名稱就可以知道這些是必要但不是那麼重要的部分另外一方面也可以再次證明說有時候不一定要在遵循特定的coding style,只要在同一個專案內保持相同的風格如此一來也是很夠很清楚地瞭解每一行程式碼的目的與作用,會這樣說是因為某時候每間公司的coding style可能會不盡相同,當有新的成員進來時,是否強制統一風格呢?我是認為大可不必,只要個人保持統一的風格即可,當然也不能太奇怪就是了.
一篇關於Code Review的文章 link
AVFoundation是個功能完成且強大的影音播放函式庫,在處理來源,控制播放與產生輸出都有相對應的物件與方法,只要調用得宜不必處理太多細節就可以駕馭影音播放的功能,但相對來說就會受限於函式庫所支援的播放格式與輸出的資料格式,不過對於一般的應用應該已經夠用了.
第二篇將介紹OpenGL的操作,包括了影像轉換的方法,手勢操作以及手機移動後如何根據偏移量而轉換影像,敬請期待.
Reference
專案原始碼連結: link
一篇關於AVPlayer的文章 link
一篇關於cancelPreviousPerformRequestsWithTarget的文章 link
一篇關於AVAsset的文章 link
APPLE官方文件,關於”loadValuesAsynchronouslyForKeys”的說明 link
APPLE官方的AVFoundation範例程式 官方連結 , 備份連結
一篇關於iOS App生命週期的文章 link
一篇關於Code Review的文章 link